Introduction: What Is Two-Point Perspective and Why Is It Important?
In the world of drawing, mastering perspective is essential for creating realistic and convincing spaces. After learning one-point perspective, the next important step is understanding two-point perspective, a technique that allows you to draw objects at an angle, giving a stronger sense of depth and dimensionality.
Two-point perspective is widely used in architectural drawings, street scenes, and any situation where the viewer is observing an object from a corner view. In this guide, you’ll learn how two-point perspective works, when to use it, and how to apply it step by step in your own drawings.
1. What Is Two-Point Perspective?
In two-point perspective, instead of using just one vanishing point like in one-point perspective, we use two vanishing points, both placed on the horizon line, usually far apart. This technique allows you to represent objects that are rotated—neither side is directly facing the viewer.
This method helps convey a more natural representation of objects in space, such as buildings seen from a corner, boxes placed at an angle, or interiors viewed diagonally.
Core Elements of Two-Point Perspective
- Horizon Line: Represents the viewer’s eye level.
- Two Vanishing Points: Usually placed far apart on the horizon line, one to the left and one to the right.
- Vertical Lines: All upright elements of the object stay vertical.
- Converging Lines: Lines of depth recede toward the appropriate vanishing point.
2. Materials You’ll Need to Practice
To draw in two-point perspective, you’ll need:
- Pencil (HB or H for sketching)
- Ruler (essential for precise construction lines)
- Eraser
- Drawing paper or sketchbook
- Darker pencil or pen for final outlines
3. Step-by-Step: Drawing a Simple Box in Two-Point Perspective
Let’s begin with the most basic shape: a box. This will help you understand the relationship between the vanishing points and how to create volume.
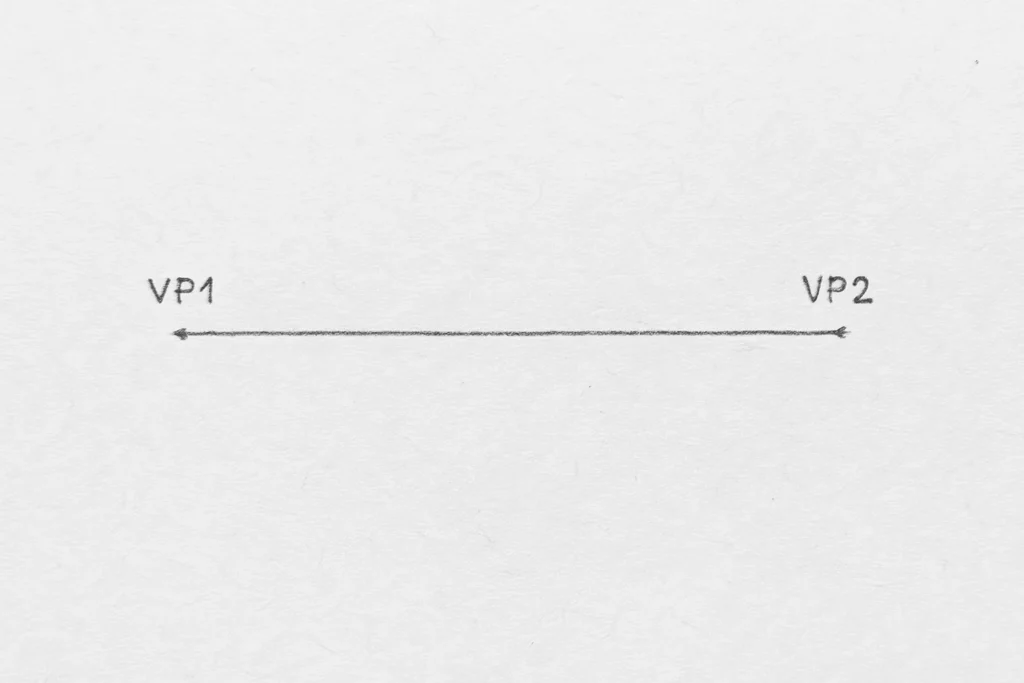
Step 1: Draw the Horizon Line and Two Vanishing Points
- Draw a horizontal line across your paper—this is your horizon line.
- Place one vanishing point (VP1) on the far left, and one vanishing point (VP2) on the far right.
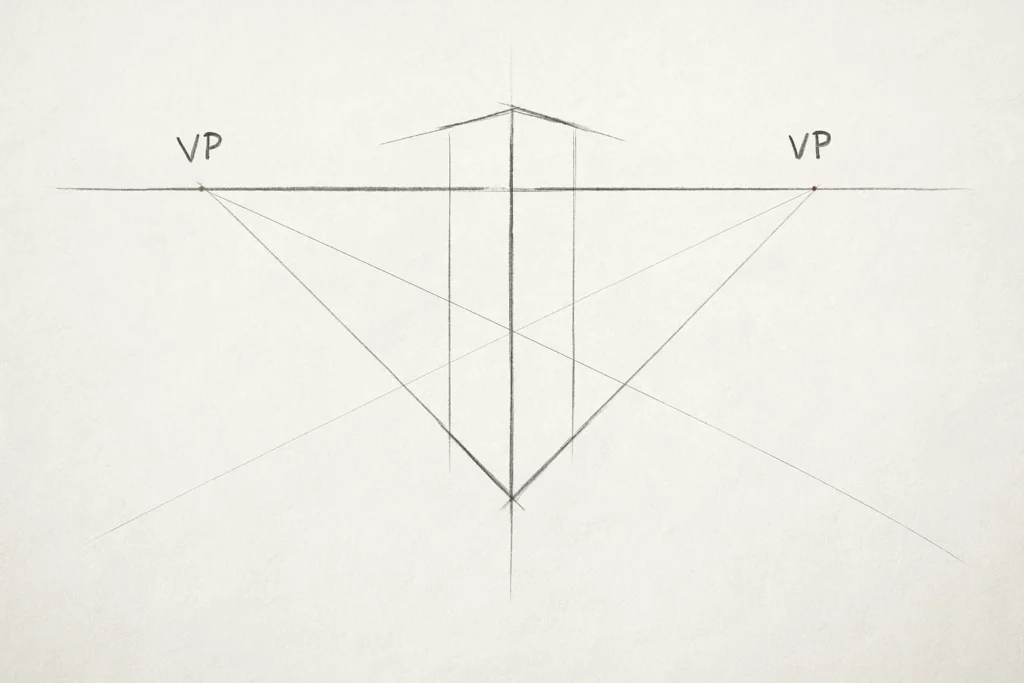
Step 2: Draw the Corner of the Box
- Near the center of the page (but below the horizon line), draw a vertical line. This will be the corner of the box facing the viewer.
Step 3: Connect the Top and Bottom of the Vertical Line to Both Vanishing Points
- From the top and bottom of the vertical line, draw lines going to both vanishing points.
- You’ll now have the beginnings of two sides of the box receding into space.

Step 4: Define the Width of the Box
- Choose a point along each of the guide lines going to the vanishing points.
- Draw two vertical lines connecting the top and bottom guide lines. These define the edges of each side of the box.
Step 5: Close the Box with Lines to the Opposite Vanishing Point
- From the top of the new vertical lines, draw lines back toward the opposite vanishing points.
- Where those lines intersect, they will define the back edges of the box.
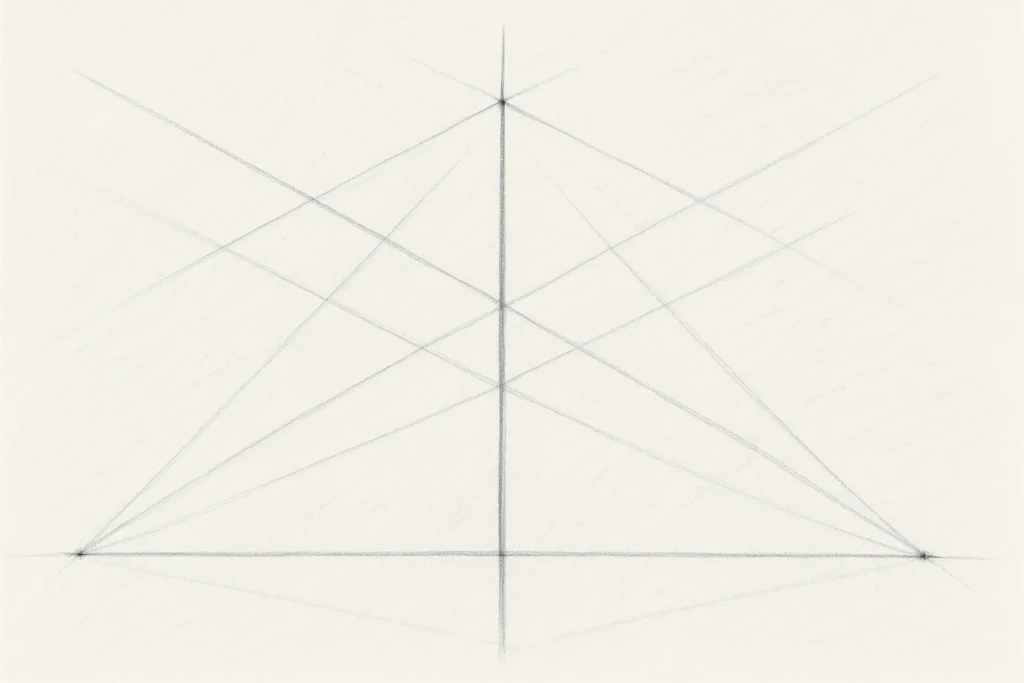
Step 6: Finalize and Clean Up
- Erase unnecessary construction lines.
- You should now have a clean, three-dimensional box drawn in two-point perspective.
4. Practical Examples Using Two-Point Perspective
Drawing a Street Corner with Buildings
- Use the same basic setup with two vanishing points.
- Begin by drawing the vertical edge of a building (the corner closest to the viewer).
- Use construction lines to define the shape of the building on both sides.
- Add windows, doors, and details, all aligned to their respective vanishing points.
Interior Room in Two-Point Perspective
- Use two points to define the room’s structure.
- Draw the walls, ceiling, and floor with converging lines.
- Add furniture like desks and shelves, starting from simple boxes.
- Maintain consistency: all depth lines must align with a vanishing point.
5. How Two-Point Perspective Differs from One-Point Perspective
| Feature | One-Point Perspective | Two-Point Perspective |
|---|---|---|
| Vanishing Points | One | Two |
| Best Used For | Frontal views (hallways) | Angled views (building corners) |
| Viewer’s Position | Facing flat surfaces | Facing a corner |
| Depth Representation | From front to back | In two directions (side-to-side) |
6. Tips to Improve Your Two-Point Perspective Drawings
Use Light Guidelines
Always start with light construction lines so you can adjust easily as the drawing progresses.
Keep Vanishing Points Wide Apart
Placing your vanishing points too close together creates unnatural distortions. Keep them far apart for a more realistic look.
Practice with Simple Forms First
Start with boxes, then move to more complex shapes like stairs, rooftops, or intersecting buildings.
Observe Real Life
Take photos of buildings, streets, or corners and try to break them down using perspective principles. This sharpens your spatial understanding.
Repeat Exercises Regularly
Like any drawing skill, mastering perspective requires repetition. Draw similar scenes multiple times to build muscle memory.
7. Common Mistakes and How to Avoid Them
Mistake: Misaligned Depth Lines
Solution: Always double-check that all horizontal lines recede to the correct vanishing point.
Mistake: Uneven Vertical Lines
Solution: Use a ruler or a triangle to keep vertical lines truly upright.
Mistake: Misplaced Vanishing Points
Solution: Sketch a large enough horizon line so the points can be placed far apart, creating better depth.
8. Exercises to Practice Two-Point Perspective
- Boxes from Different Angles: Draw boxes at various positions along the horizon line.
- Stacked Cubes: Practice stacking boxes vertically using perspective lines.
- Windows and Doors: Add repeating elements like windows in a building.
- Outdoor Scene: Sketch a corner street scene from a reference photo or real life.
- Interior Scene: Draw a room’s corner with furniture aligned in two-point perspective.
Conclusion: Take Your Drawing to the Next Level with Two-Point Perspective
Learning two-point perspective is a game-changer for beginner artists. It allows you to break away from flat, head-on views and create more dynamic, realistic drawings that have structure and depth.
With consistent practice, observation, and a solid understanding of construction lines and vanishing points, you’ll be able to draw urban scenes, interiors, architecture, and more with confidence.
So grab a pencil, a ruler, and start experimenting with two-point perspective today—one line at a time, you’re building your world in 3D.